- Google Cloud
- Articles & Information
- Cloud Product Articles
- Using your own Identity Provider with the Apigee E...
- Subscribe to RSS Feed
- Mark as New
- Mark as Read
- Bookmark
- Subscribe
- Printer Friendly Page
- Report Inappropriate Content
- Article History
- Subscribe to RSS Feed
- Mark as New
- Mark as Read
- Bookmark
- Subscribe
- Printer Friendly Page
- Report Inappropriate Content
This article was co-authored by Federico Preli and Joel Gauci
About the Apigee Envoy Adapter
The Apigee Adapter for Envoy is based on the Policy Decision Point (PDP) pattern that allows an API gateway that uses Envoy to proxy API traffic. This lightweight "API gateway" based on Envoy is controlled by an Apigee platform, acting as a control plane.
The Envoy Adapter (EA) is the component connected to an Apigee platform and dedicated to poll the Apigee platform to get information about client applications, API products, real time quotas and to push analytics data back to the Apigee management services.
The API gateway based on Envoy uses an EA through an external authorization filter, which is part of the Envoy configuration.
Using the EA the Envoy proxy can enforce the following controls:
- API Key authentication/authorization
- JWT token authentication/authorization
- Distributed quotas enforcement
Analytics Reporting can also be pushed from the Envoy proxy to the Apigee platform through the EA.
The high level architecture of the Apigee Adapter for Envoy can be found in the Google official documentation.
Last but not least, the Apigee EA can also be used in the context of an Istio Service Mesh.
Purpose of this article
This article describes how to configure the Apigee EA and the components that are required when JSON Web Tokens (JWT) are issued by an identity provider (IdP) that is not Apigee.
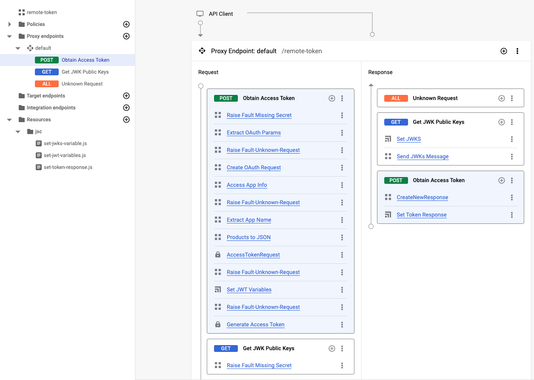
The Apigee remote-token API proxy is the default security mechanism that is installed on an Apigee runtime to authenticate client applications and deliver JWT tokens based on the OAuth2.0 client_credentials grant type. Besides delivering JWT tokens to the client, the remote-token API proxy exposes a JSON Web Key Set (JWKS) that is used to verify JWT tokens at the Envoy API gateway level, using Envoy’s JWT authentication filter.
This is an overview of the remote-token API proxy once provisioning is complete on an Apigee platform:
But what is the configuration to implement when the remote-token service cannot be/is not used?
And what are the implications of using an external IdP instead of the default remote-token service offered by Apigee?
In this article, we choose to provide the required configuration based on the usage of the EA in the context of a standalone API gateway but the same principles apply when the EA is used in the context of an Istio/Anthos Service Mesh (ASM).
Requirements
The following requirements need to be met if you decide to use your own IdP with the Apigee Adapter for Envoy:
- An identity provider that is able to deliver JWT tokens based on the client_credentials grant type and that can expose the JWKS required to verify the JWT tokens that are generated
- An Apigee platform, which can act the control plane for an existing Envoy Adapter
- An Envoy Proxy that is used as a standalone gateway between client applications and backend APIs
Solution Overview
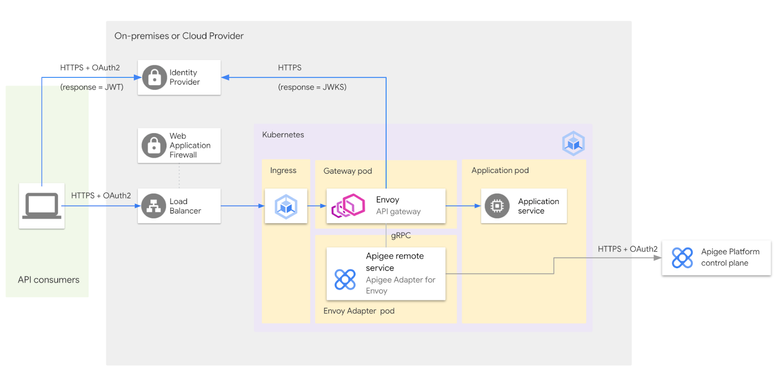
In this section we provide a solution for using your own IdP in the context of the Apigee Adapter for Envoy. A diagram of the different actors and the interactions between them is provided below.
Sequence diagram
The following sequence diagram shows the different actors and the communication between them:
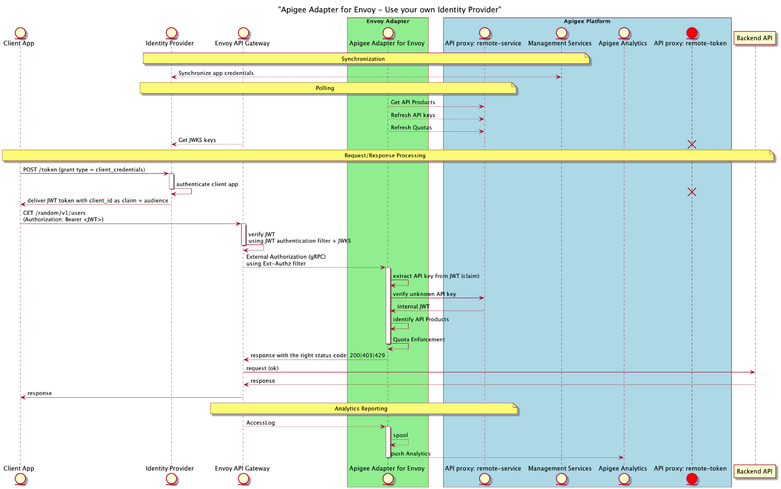
As you can see, once you implement your own IdP, the remote-token API proxy is not used (in red on the picture above). Instead, your identity provider acts as the solution to authenticate client applications, based on the OAuth2.0 client_credentials grant type. This means that any OAuth2.0/OIDC compliant identity provider can be used.
The result for the client app authentication is a JWT token, which is only required to contain the value of the consumer key (aka client Id or API key), set as a claim.
The same IdP can generally be used to deliver a JWKS to perform JWT verification. The list of available endpoints for the IdP is presented through the IdP's discovery document.
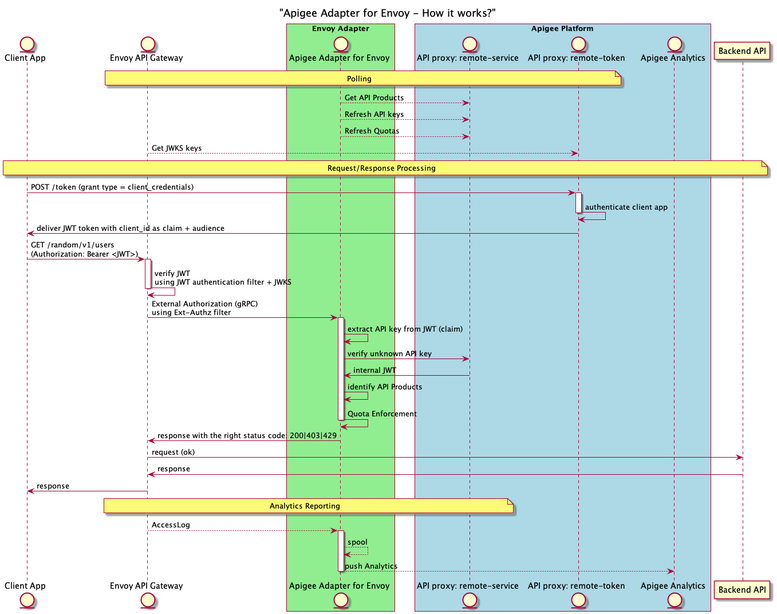
As a reminder, this is the default implementation, based on the remote-token API proxy:
API Key and audience in JWT token
Here is an example of a decoded JWT delivered by an IdP (keycloak in this example - some parts have been anonymized or removed):
Headers:
{
  "alg": "RS256",
  "typ": "JWT",
  "kid": "xxx-hDdT0fzv9o4lWfUesoHN8Tggb0"
}
Payload:
{
  "exp": 1665934291,
  "iat": 1665933991,
  "jti": "5745eeb7-b36d-4ccf-8384-f6b9b5565ed0",
  "iss": "https://xxx/auth/realms/demo-ea",
  "aud": "remote-service-client",
  "sub": "d7a12a36-79a9-4086-91ea-a8a0ce8babb7",
  "typ": "Bearer",
  "azp": "dummy-client_id-1234567890",
  "session_state": "dff204cf-4b15-46e1-ba9e-4e1e6b8efaa3",
  "acr": "1",
  "scope": "profile email",
  "apiKey": "dummy-client_id-1234567890",
  "clientHost": "10.x.x.x",
  "email_verified": false,
  "clientAddress": "10.x.x.x"
}
The JWT signature is verified using the JWT authentication filter defined at the Envoy configuration level.
The JWT authentication filter is configured with the following information:
- The remote JWKS or inline public certificate used to verify the JWT signature
- The audiences (defined as an array) used to verify the audience value set in the JWT
Once the JWT has been validated, it is transferred - through an external authorization call - to the EA that is responsible for extracting the API Key to be verified. The name of the claim that contains the API key (apiKey in the example above) is set at the EA configuration level.
The configuration of the EA is provided as a YAML file and can be generated by the Apigee Envoy Adapter CLI.
We provide EA and Envoy proxy configuration details specific to the integration with a third party IdP in the next section.
Configuration details
To use your own IdP with the Apigee Adapter for Envoy, you need to modify the following configuration files:
- ea-config.yaml: this is the EA configuration file that can be created using the Apigee Adapter for Envoy CLI. Please refer to the following link to learn how to install and use the EA CLI
- standalone-envoy-config.yaml: the configuration file of the standalone Envoy proxy. If you use the EA with Istio you would have to modify the Istio resources instead.
EA Configuration
Here is an extract of a valid configuration file for the EA (ea-config.yaml). For security reasons, some values have been removed or anonymized:
# Configuration for apigee-remote-service-envoy (platform: GCP)
# generated by apigee-remote-service-cli provision on 2022-10-24 11:43:07
apiVersion: v1
kind: ConfigMap
metadata:
  name: apigee-remote-service-envoy
  namespace: apigee
data:
  config.yaml: |
    tenant:
      remote_service_api: https://<apigee-hostname>/remote-service
      org_name: xxx-xxx
      env_name: eval
    analytics:
      collection_interval: 10s
    auth:
      jwt_provider_key: https://<idp-hostname-and-port>/<token-endpoint-uri>
      append_metadata_headers: true
      api_key_claim: apiKey
---
...
This kubernetes manifest file can be passed directly to the EA on startup or used to create a ConfigMap on the EA's target kubernetes cluster.
The data of this ConfigMap contains the properties used by the EA (cf. config.yaml section of the manifest file) to connect to the Apigee platform.
The different keys that can be used in the config.yaml content are presented in the EA references.
More specifically, the api_key_claim property defines the name of the claim (apiKey in the example above) that must be presented in the JWT token delivered by the IdP. This JWT claim contains the value of the API key that is extracted and verified by the EA or the Apigee remote-service API proxy.
Standalone API Gateway (Envoy proxy) Configuration
The Envoy proxy configuration provides the different HTTP Filters. One of these filters is the JWT authentication filter.
Some properties of the JWT authentication filter are linked to the IdP that is used, as presented in the following example:
…
## HTTP FILTERS
http_filters:
…
- name: envoy.filters.http.jwt_authn
  typed_config:
      "@type": type.googleapis.com/envoy.extensions.filters.http.jwt_authn.v3.JwtAuthentication
      providers:
          my-own-idp:
              issuer: https://<idp-hostname-and-port>/auth/realms/demo-ea
              audiences:
                - remote-service-client
              remote_jwks:
                http_uri:
                  uri: https://<idp-hostname-and-port>/auth/realms/demo-ea/openid-connect/certs
                  cluster: my-own-idp-service
                  timeout: 5s
                cache_duration:
                  seconds: 300
              payload_in_metadata: https://<idp-hostname-and-port>/auth/realms/demo-ea/openid-connect/token
          rules:
          - match:
              prefix: /
            requires:
              requires_any:
                requirements:
                - provider_name: my-own-idp
                - allow_missing: {}

…

## CLUSTERS
clusters:
- name: my-own-idp-service
    connect_timeout: 2s
    type: LOGICAL_DNS
    dns_lookup_family: V4_ONLY
    lb_policy: ROUND_ROBIN
    load_assignment:
      cluster_name: my-own-idp-service
      endpoints:
      - lb_endpoints:
        - endpoint:
            address:
              socket_address:
                address: <my-own-idp-hostname>
                port_value: <my-own-idp-port>
    transport_socket:
      name: envoy.transport_sockets.tls
      typed_config:
        "@type": type.googleapis.com/envoy.extensions.transport_sockets.tls.v3.UpstreamTlsContext
        sni: <my-own-idp-hostname>
…
In the example above, my-own-idp contains the properties of the identity provider that is used, and which replaces the Apigee remote-token API proxy.
The Envoy cluster my-own-idp-service provides the definition of the IdP that is accessed through HTTPS.
Implications of using your own IdP
When using your own IdP, the client application credentials must be the same on the identity provider (where the client app is created and authenticated) and the Apigee organization (where the client app is identified).
Therefore it is necessary to synchronize the client app credentials between the IdP and the Apigee organization for the different states of a client application, which are:
- Created
- Deleted
- Revoked
- Archived
The list of Apigee API products to which client application credentials are bound is also an important parameter. Keep in mind that an API product provides the HTTP method(s), path(s), and quotas for the target remote services that client application credentials are allowed to consume.
Basically, the synchronization mechanism that must be developed can use the Apigee APIs.
Other important considerations must be taken into account like the creation of a client application on a developer portal. These technical considerations are not discussed in this article.
Basic Apigee APIs Calls
Examples of Apigee API calls for creating, updating client app credentials and linking them with an API Product are provided here for Apigee X and hybrid (same API calls exist for other Apigee runtime options)
Create a Developer App and a Client Application
The cURL command to create a client application is presented here. We start with the creation of an app developer and then the client application:
# Apigee token and organization

APIGEE_TOKEN=$(gcloud auth print-access-token)

APIGEE_X_ORG=<your-apigee-organization>

# create an app developer

curl -X POST \
-H "Authorization: Bearer $APIGEE_TOKEN" \
-H "Content-Type:application/json" \
--data " {\"email\": \"john.doe@example.com\",\"firstName\": \"John\",\"lastName\": \"Doe\",\"userName\": \"jdoe\"}" \
https://apigee.googleapis.com/v1/organizations/"$APIGEE_X_ORG"/developers -v

# create a client app

curl -X POST \
-H "Authorization: Bearer $APIGEE_TOKEN" \
-H "Content-Type:application/json" \
--data " {\"name\": \"my-client-app\"}" \
https://apigee.googleapis.com/v1/organizations/"$APIGEE_X_ORG"/developers/john.doe@example.com/apps -v
Set Client App Credentials
The cURL command to set client application credentials is presented here. We assume the client credentials set on the IdP are:
- client_id: dummy-client_id-1234567890
- client_secret: x-secret
# Apigee token and organization

APIGEE_TOKEN=$(gcloud auth print-access-token)

APIGEE_X_ORG=<your-apigee-organization>

# set client app credentials

curl -X POST \
-H "Authorization: Bearer $APIGEE_TOKEN" \
-H "Content-Type:application/json" \
--data "{ \"consumerKey\": \"dummy-client_id-1234567890\", \"consumerSecret\": \"x-secret\" }" \
https://apigee.googleapis.com/v1/organizations/"$APIGEE_X_ORG"/developers/john.doe@example.com/apps/my-client-app/keys/create -v
What if my external App credentials/Client Id is too big?
Please note that there is a limit on the size of the consumer key (client Id) and consumer secret (client Secret) that you must be aware of if you want to import existing consumer keys and secrets from an IdP.
In case you need to use keys above these limits, you must apply a computation/digest of the original keys (originated from the IdP) to create the app credentials in Apigee.
Therefore the remote-service API proxy must be modified to take into account the same computation/digest after the API key has been extracted from the JWT token received as an authorization bearer.
This can be achieved using a JavaScript policy. In this case, it is prominent to clone the git repository of the Apigee Adapter for Envoy CLI and modify the configuration of the remote-service API proxy to integrate the new policy and endpoint configuration. You will also need to patch each version of the EA CLI regarding the different versions of the CLI that you want to use.
The configuration of the remote-service API proxy exists for the two Apigee runtime options:
Bind the client app credentials with an existing API Product
The cURL command used to bind client application credentials with an existing API Product is presented here. The requirement is that the API Product is implemented with operations based on remote services and not API proxies.
We assume the name of the API product is DemoProduct:
# Apigee token and organization

APIGEE_TOKEN=$(gcloud auth print-access-token)

APIGEE_X_ORG=<your-apigee-organization>

# bind client app credentials with an existing API product

curl -X POST \
-H "Authorization: Bearer $APIGEE_TOKEN" \
-H "Content-Type:application/json" \
--data "{ \"apiProducts\": [\"DemoProduct\"] }" \
https://apigee.googleapis.com/v1/organizations/"$APIGEE_X_ORG"/developers/john.doe@example.com/apps/my-client-app/keys/dummy-client_id-1234567890 -v
Testing the solution with the keycloak IdP
In this section we discuss a test of the solution in the following context:
- Keycloak is used as the Identity provider
- The Apigee Adapter for Envoy is used with an Envoy gateway used in standalone mode. The EA and the Envoy gateway are installed on a kubernetes cluster (Google Kubernetes Engine on GCP)
Create a client app on keycloak
The first step consists in creating a client application on keycloak.
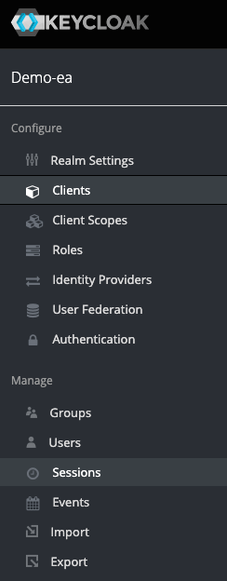
From the administration console, access your realm (here demo-ea or create one) and select the Clients tab from the left pane, as shown on the following picture:
This client client app must be configured as "confidential" to benefit from a client Id and a client secret. A redirect URI must be provided even though it is not used in the client_credentials flow.
The following picture presents the configuration of the client application in keycloak:
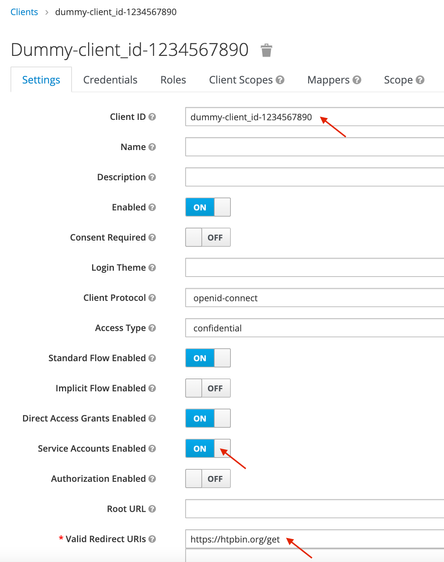
The client Id is dummy-client-id_1234567890
The client secret is presented on the Credentials tab, as shown on the following example:
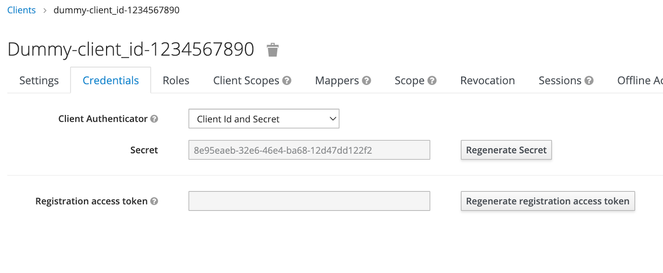
The client Id and secret will be used later to create a client app on Apigee with the same app credentials.
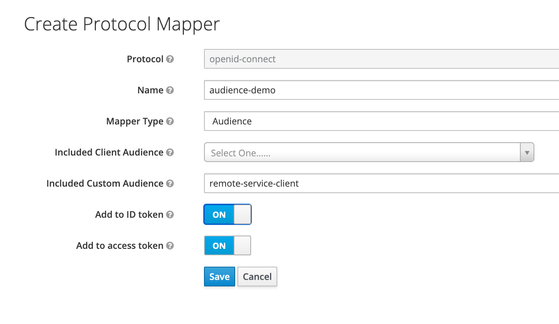
In order to inject the audience (remote-service-client) on the JWT token that is created as a result of the client app authentication, we need to create a protocol mapper on the client app in keycloak. In keycloak, a protocol mapper is used to perform transformation on tokens.
For this, select the client app and switch to the Mappers tab.
Create a protocol mapper (audience-demo in our example) of type "Audience", as presented on the following picture:
Select the existing "Client ID" mapper, and modify its configuration to change the name of the client id's claim presented in the JWT token, as shown on the following picture:
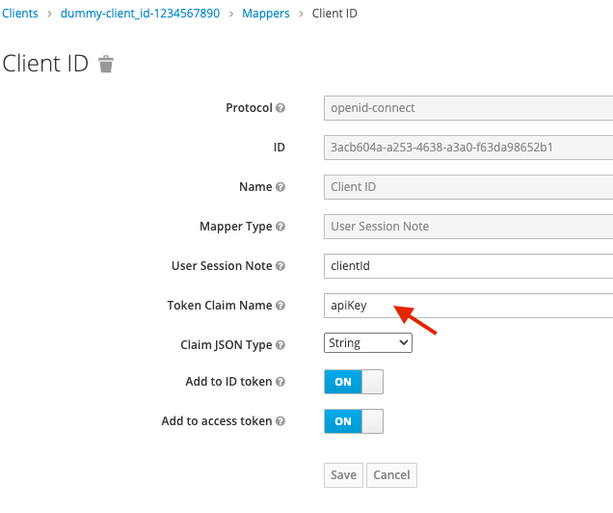
The name of the claim that contains the client ID in the JWT is now apiKey. You can now save the configuration of the client app in keycloak.
Authenticate the client app
In order to get a JWT token from the keycloak IdP, you must execute the following request, using the client Id and client Secret of the app you have just created:
curl --location --request POST 'https://<your-idp-hostname-and-port>/auth/realms/demo-ea/protocol/openid-connect/token' \
--header 'Content-Type: application/x-www-form-urlencoded' \
--data-urlencode 'client_id=<your-client-id>' \
--data-urlencode 'client_secret=<your-client-secret>' \
--data-urlencode 'grant_type=client_credentials'
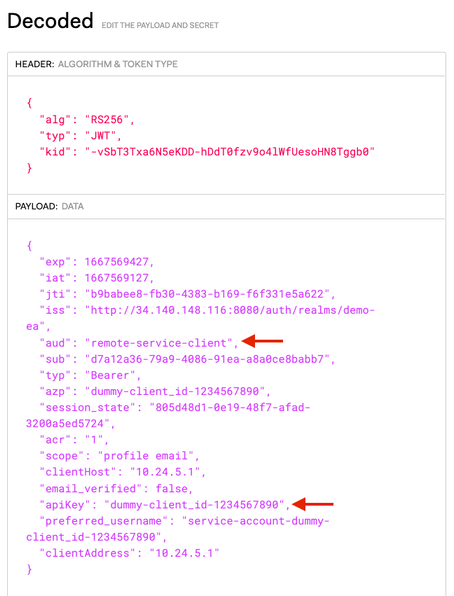
The result is a JWT token, as presented in the previous section: API Key and audience in JWT token.
You can use a solution like jwt.io to decode the JWT header and payload and verify the aud (audience) and apiKey claim, as presented on the following picture:
Use the Apigee Control Plane
You can now connect to the Apigee control plane and create an API product that describes the target remote service (backend API) that you want to access from the Envoy proxy.
The information you must provide at the API product level are (the values are provided as examples):
- The name and display of the API product
- Quota
- The environment associated with the API product
- The remote service:
- httpbin.org
- Path: /httpbin/*
- Method: GET
The remote service must be created using an Operation defined at the API product level, as shown on the following example:
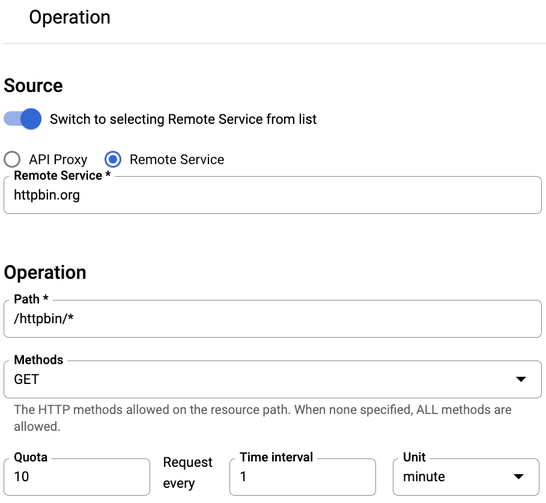
Here the remote service is httpbin.org
This means the Envoy API proxy configuration must define an Envoy listener with a route config to:
- match the prefix /httpbin
- route the request to a specific Envoy cluster that defines how to access httpbin.org (for instance: HTTP on port 80)
- rewrite the prefix URI (for instance: "/" )
To go on with the preceding example, the request on the Envoy API gateway: https://<envoy-api-gayeway>/httpbin/headers will be forwarded to the target endpoint http://httpbin.org/headers
It is important to understand that the configuration of the API products and client applications in Apigee are used to verify - at the Envoy Adapter level - if the client app is authorized to consume the API exposed on the Envoy proxy and apply the right quota enforcement (for instance: 10 requests per minute for an identified client app).
The configuration on the Apigee control plane does not modify the configuration of the Envoy API gateway.
The HTTPBin API product that has been created can now be associated with a client application on Apigee. Remember that this client application must benefit from the same client credentials as the application created on the keycloak IdP.
For this, you can use the Apigee APIs, as presented in the previous section.
Use the JWT token to access APIs
You can now use the JWT token (you may have to recreate one if it has expired…) delivered by the keycloak IdP to consume the API exposed at the Envoy proxy level, using the following curl command:
# TOKEN contains the JWT token delivered by keycloak

curl -X GET \
-H "Authorization: Bearer ${TOKEN}" \
-H "Host: httpbin.org"
https://<envoy-api-gayeway>/httpbin/headers -v
Possible responses:
- you should get a 200 status code and a JSON response.
- If too many requests have been submitted (regarding the quota defined at the API Product level) an error code 429 is returned with reason phrase Too many requests
- If the JWT has expired or is not verified, or if the API Key is not valid, an error code 403 is returned.
Please refer to the troubleshooting section of the Apigee Adapter for Envoy documentation for more details on possible errors.
Thanks a lot to Daniel Strebel and Scott Ganyo for their feedback on drafts of this article!
- Mark as Read
- Mark as New
- Bookmark
- Permalink
- Report Inappropriate Content
Great article. I was facing an issue related to this kind of scenario a few weeks ago and this content will be quite valuable.

 Twitter