This website uses Cookies. Click Accept to agree to our website's cookie use as described in our Privacy Policy. Click Preferences to customize your cookie settings.
Turn on suggestions
Auto-suggest helps you quickly narrow down your search results by suggesting possible matches as you type.
Showing results for
- Looker & Looker Studio
- Looker Forums
- Developing Applications
- Re: Sending Custom Emails with Looker Data: Looker...
Topic Options
- Subscribe to RSS Feed
- Mark Topic as New
- Mark Topic as Read
- Float this Topic for Current User
- Bookmark
- Subscribe
- Mute
- Printer Friendly Page
Solved


 LinkedIn
 Twitter
Post Options
- Mark as New
- Bookmark
- Subscribe
- Mute
- Subscribe to RSS Feed
- Permalink
- Report Inappropriate Content
Reply posted on
--/--/---- --:-- AM
Post Options
- Mark as New
- Bookmark
- Subscribe
- Mute
- Subscribe to RSS Feed
- Permalink
- Report Inappropriate Content
Sending Custom Emails with Looker: Looker + Zapier Integration
While Looker’s built-in emailing functionality solves a majority of emailing use cases, suppose you want to send out an email externally in an email template that reflects your branding, while still leveraging Looker’s alerting functionality and governed metrics. Due to Looker’s flexibility in programmatically sending out data, you can leverage Looker + Zapier to send data to the 1000+ integrations that Zapier has built-in. In this case, we will use the SendGrid Action within Zapier to send custom emails, which requires a free* SendGrid account and a free Zapier account.
*Update [4/22/19]: Zapier now requires a SendGrid Pro account or higher to leverage this functionality - however, the steps below are the same for using the Zapier's built-in in Gmail integration, or the Email by Zapier integration, and provide the same end result.
Sample Use Case
An events company wants to send out information about sales, orders, and profit externally to the representatives for that event, the day after an event is completed. Before Looker, this process involved extracting data and sending it via email manually as a spreadsheet to the representative. Now, this process is completely automated by following the below steps.
A. SETTING UP THE LOOKER REPORT AND ZAPIER INTEGRATION
In this part, we will set up the connection between Looker and Zapier, to get the data from Looker into Zapier in a format that makes it easy to incorporate into custom emails.
Pre-requisites:
Look with the relevant information: In the Look, there should be a recipient email, as well as any metrics and information you want to include in the email on the same row. Note that each recipient’s metrics need to exist within a single row.
Zapier account: if you do not have one already, you can sign up for free here.
SendGrid account: if you do not have one already, you can sign up for free here.
Step 1: Creating a Look [Looker]
Create a Look with the relevant information following guidelines above.
In the below example, I’ve created a Look with the contact’s email address, name, the event name, the event date, and some metrics about that event.

Step 2: Creating the Zap [Zapier]
Open up Zapier in a new tab and login to your account. Click “Make a Zap!” in the top right corner of the page, and at the Choose an App step, type in Webhook in the search bar (see the screenshot below). See Zapier’s documentation on how to create a Zap manually.

In the “Choose Trigger” Step, select “Catch Hook” – this tells Zapier to wait for a schedule from Looker before taking the action.
Then, click “Copy to Clipboard” on the “Set Up Webhook” step.

You’ll be prompted to Pick a Child Key – type in ‘data’. This tells Zapier to only look at the data coming from Looker, as opposed to the other metadata (such as user, time of query, etc.). You can also name your Zap in the top left of the page – I named this one “Ticket Sales Update”

Click “Continue” to go to “Test This Step” and, before clicking “Ok I did this”, switch back to your Looker tab.
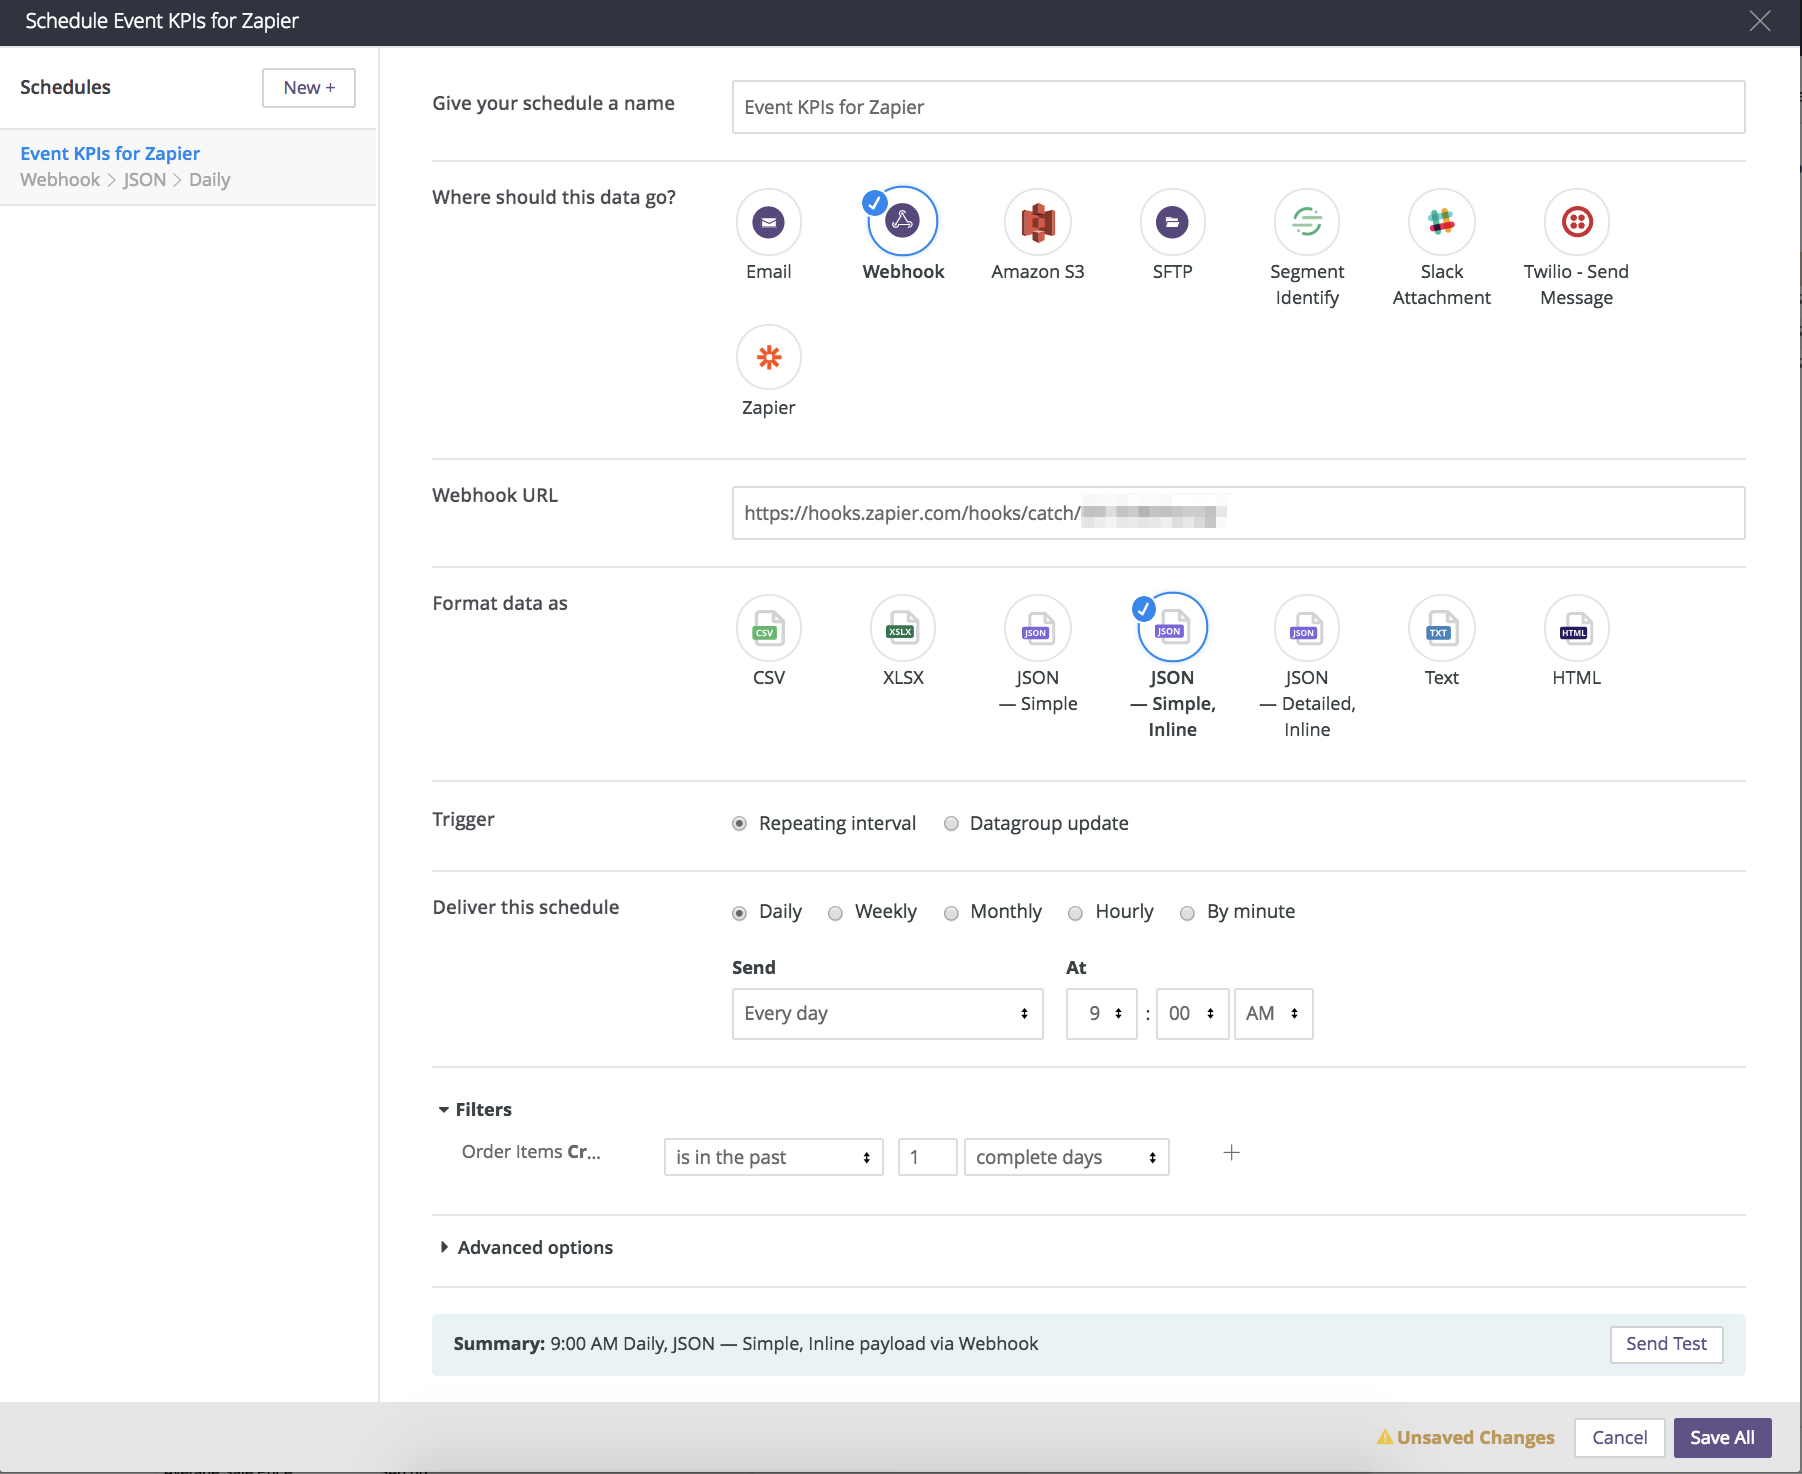
Step 3: Sending a Sample Webhook for Testing [Looker]
Switch back to the Looker tab and, from Looker, create a schedule with Webhook as the destination and JSON - Simple, Inline as the format. In the destination, paste that same Webhook we had copied from Step 2 above. Once you do that, click the “Send Test” button in the screenshot below.

Step 4: Ensuring the Webhook delivered successfully [Zapier]
Switch back to the Zapier tab to Test This Step, and after clicking “Ok I did this”, you should see a list of sample hooks that Zapier pulled in. In the below screenshot, you see three hooks because there are three lines of data.
Note that this step is just for testing, so as long as Zapier receives the hook and you see the underlying data for a single row when clicking on a hook, it does not matter which hook you choose to set up the Zap, as it will iterate through all rows once fully set up. I am going to choose Hook A for this example.

B. SETTING UP THE SENDGRID ACTION
Now that we’ve successfully captured the data from Looker into Zapier, we will set up a SendGrid action to turn that information into a customizable email. Note that while we are using SendGrid for this example, now that you’ve captured that data in Zapier you can send it to any of Zapier’s 1,000+ app integrations.
Step 5: Creating the SendGrid Action [Zapier]
Click the Add a Step button in Zapier, and click Action/Search. Search for SendGrid – this is what we will use to distribute the emails.

Click Continue, then click Continue at the “Choose Action” step with Send Email selected.
For Choose Account, login using your SendGrid credentials, then click Save + Continue. If you don’t have a SendGrid account, you can sign up for a free one here.
Step 6: Creating the SendGrid Email Template [Zapier]
At the Set Up Template step, you can now set up the exact email template you’d like to use, while leveraging the information from Looker. By clicking the button highlighted in screenshot below, you can choose which parts of data payload you want to insert in the To, From, From Name, Reply To, Subject, and Body.
- NOTE: for the body of the message, you can either type into the Text section or use any custom HTML formatting in the HTML area, while incorporating data points from Looker.
- NOTE: only one hook will show up here (the same hook we selected in Step 4) because this is just a template. Once this is set up, it will iterate through every row of data.

Final SendGrid template:

Below, you’ll see an HTML email template with different metrics and data inserted at different parts of the code. HTML is the standard language used for email templates - if your organization already has a standard one, you can leverage that here and replace placeholder values with the data points from Looker, the same way I did for the other parts (To, Subject, etc.) of the SendGrid email template above.

- NOTE: If you don’t have a standard HTML email template you use as an organization, you can get the HTML behind any email in Gmail by clicking “Show original” in the top right corner of any email, copying the code from there below
<!DOCTYPE html>, and then decoding it using a website like this one. To do that, paste the HTML from above in the bottom section of the webpage, click decode, and copy the decoded version and insert it into Zapier. Additionally, you can create email templates directly in SendGrid.
Once you’ve written your email framework or put in the HTML, go to Test This Step and Click “Send Test to SendGrid” and Zapier will let you know if the message delivered successfully. If it does, you are ready to turn on the Zap in the top right of the page.
Step 7: Creating the schedule [Looker]
Once you do that, go back to your tab with the Looker report open, and since the scheduler is still up, set that up to delivery to that same Webhook address from Step 3 at whatever cadence you desire.
Bringing it back to our sample use case, the Customer Service team can schedule this from Looker to run daily, filtered down to events that happened the day before, so they now no longer have to manually compile Event KPIs and email spreadsheets to their customers - Looker will send these automatically each morning.
- Note: you can follow same steps but leverage Looker’s alerting capabilities by utilizing the Advanced options section of the scheduler documented here. Additionally, here is a video walkthrough of our alerting. For the above use case, one application could be the Customer Service team filtering based on a certain profit threshold, and sending a congratulatory note automatically if that profit threshold is met.
Output
This email has parameterized information in the Subject (“Birthday Party”), as well as each of the rows in the HTML table in the body of the email. If I send the Webhook from Looker, an email similar to the one below will be generated and sent for each row of data, parametrized to the recipient.

By leveraging our integration with Zapier, you can programmatically send emails, backed by Looker, with your own custom branding, while taking advantage of Looker’s alerting capabilities and governance. While we used SendGrid here, Zapier has a robust library of integrations you can now leverage following similar steps.
0
2
3,259
2 REPLIES 2
Post Options
- Mark as New
- Bookmark
- Subscribe
- Mute
- Subscribe to RSS Feed
- Permalink
- Report Inappropriate Content
Reply posted on
--/--/---- --:-- AM
Post Options
- Mark as New
- Bookmark
- Subscribe
- Mute
- Subscribe to RSS Feed
- Permalink
- Report Inappropriate Content
Does it allow us to modify the unsubscribe link in the email? Looker email provides a link to unsubscribe from the schedule. However, we would like to add our own link or modify this link to navigate to our own webpage to handle the subscription. Is there a way to do so using this integration?

Post Options
- Mark as New
- Bookmark
- Subscribe
- Mute
- Subscribe to RSS Feed
- Permalink
- Report Inappropriate Content
Reply posted on
--/--/---- --:-- AM
Post Options
- Mark as New
- Bookmark
- Subscribe
- Mute
- Subscribe to RSS Feed
- Permalink
- Report Inappropriate Content
It seems Zapier free version does not allow Webhook integration any more. Need to have the premium version
Top Labels in this Space
-
access grant
1 -
actionhub
6 -
Actions
103 -
Admin
3 -
AI ML General
1 -
alert
1 -
Analytics Block
34 -
API
159 -
Authentication
8 -
BigQuery
7 -
blocks
2 -
boards
4 -
Bug
23 -
cache
2 -
Components
67 -
connection
5 -
connection database
2 -
content access
1 -
content-validator
3 -
customdimension
1 -
Dashboards
92 -
Data
4 -
Data Sources
1 -
Database
3 -
deprecated
1 -
derivedtable
2 -
develop
2 -
development
2 -
done
3 -
downloading
1 -
drilling
3 -
dynamic
2 -
embed
60 -
Embedding
72 -
Errors
6 -
etl
2 -
explore
4 -
Explores
4 -
Extensions
15 -
feature-requests
2 -
filed
1 -
Filter
35 -
folders
2 -
Gemini
1 -
git
7 -
Google Sheets
1 -
googlesheets
1 -
i__looker
1 -
Integrations
1 -
javascript
5 -
json
2 -
links
1 -
liquid
1 -
Looker
1 -
Looker API
145 -
LookerStudio
1 -
LookML
38 -
lookml dashboard
3 -
looks
11 -
Marketplace
25 -
merge
2 -
modeling
1 -
mysql
1 -
Networking
1 -
on-hold
1 -
parameter
2 -
pdf
3 -
pdt
2 -
permission management
3 -
postgresql
1 -
Projects
1 -
python
26 -
pythonsdk
7 -
Query
11 -
query manager
2 -
quickstart
1 -
ReactJS
10 -
redshift
3 -
release
6 -
schedule
16 -
schedule delivery
2 -
sdk
56 -
server configuration
1 -
sharing
1 -
snowflake
2 -
SQL
7 -
SSO
7 -
System Activity
2 -
tests
1 -
Ui
1 -
user access management
3 -
user management
5 -
user-attributes
12 -
Vertex AI Platform
1 -
Views
2 -
Visualizations
44 -
watch
1 -
webhook
6
- « Previous
- Next »